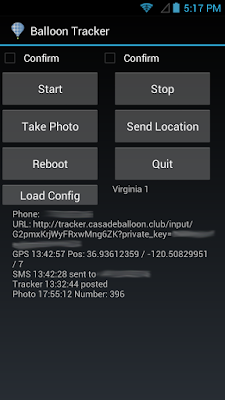
For those of you interested in making simple Android apps such as this one, we made our app source code available — feel free to clone, fork, and tweak!
Background
When we started on our ballooning adventures, we decided our very first payload would be a simple Android phone — after all, it has GPS, a camera, and a radio, and we would not be too upset over losing $50 worth of electronics.
We were hoping to use one of the many GPS tracking and camera time lapse apps already available in the Play Store, but unfortunately none of them worked precisely the way we wanted, so we decided to make our own.
Hello World!
None of us had ever developed an Android app before, so the obvious first place to start was with the Getting Started tutorials.
This was surprisingly easy — we had a skeleton app up and running on a cheap Android phone with just an afternoon of hacking.
We deliberately set our application to target API Level 15 (Android 4.0.4) because that API level had all the features we wanted and allowed us to run the same app on a variety of old / disposable hardware.
MainActivity
We tweaked the screen from the first tutorial tutorial into the main control screen for our app:
This includes some basic config display/settings capability as well as buttons to test specific functions of the app such as sending a location SMS or taking a photo.
MainService
Right from the start, we knew our app would need a background service which would periodically text GPS coordinates to a specific number.
After getting a simple app running, we skipped the rest of the Android developer tutorials and went straight to the section on creating background jobs.
One of the unique and extraordinary things about Android is the power of background services — they literally can do anything that a normal app can do with no random constraints. GPS, HTTP, SMS, photos — our background service could do whatever it wanted!
Location Listeners
The next thing we decided to work on was location services, which was surprisingly complicated but extensively documented.
Most of the location-related documentation talks about different strategies for finding location and tradeoffs in terms of accuracy and power consumption. For our application, the goal was to have as accurate and up-to-date a location as possible, and we didn't care about burning power in the process because we had plenty of battery life.
Even though we only needed location updates every ~30 seconds to geotag our photos, we learned that if there was too great an interval between requested updates, the GPS location provider would lose the fix and not always reacquire it fast enough. Thus we added a noop location listener which subscribed to location updates every 150ms, forcing the GPS chip to maintain a continuous fix.
We also added an NmeaListener which logged the GPS coordinates to a file in a standard format parseable by lots of mapping tools.
Status SMS
Now that we were getting GPS coordinates, it was time to send them back to us via SMS. A simple Timer kicked off in MainService triggered a static sendLocationSMS utility function which fetched the latest GPS coordinates, converted them to a clickable Google Maps URL, and sent them to us.
The SmsManager docs were a bit beginner-unfriendly, but the Android developer community came to the rescue with a simple example.
Since we had a couple extra characters left in our SMS payload, we decided to add battery voltage courtesy of the BatteryManager.
Photo Activity
With the tracking function up and running, the next question was how to take some photos. We experimented with many different code snippets to take a photo, but learned that some Android devices (like the Nexus 5) refused to take a photo unless a live preview to an active canvas was enabled.
Thus we decided to create a single-purpose photo activity which would initiate a photo capture on startup and then quit after capture success.
The Android Camera API is quite sophisticated, and we really dug into and tweaked most of the available settings in order to make sure we were taking the best pictures we could.
A couple of the more important parameters we set include:
- Flash off
- Focus at infinity (for high-altitude landscape photos there is no point trying to autofocus)
- "Action" or "Sports" scene modes to favor higher shutter speeds over lower ISOs and prevent our pics from being blurry due to balloon movement
- Highest JPEG quality — we were using external SD cards with plenty of storage space
- EXIF GPS and Timestamp info if it was available from location services
Under normal use, we had this activity triggered by an AlarmReceiver which itself was triggered at regular intervals by an AlarmManager. Android Alarms are another fascinating topic with lots of relevant documentation.
Other Fun Notes
In later versions of the app, we added support for periodically uploading the current location to tracker.casadeballoon.club, giving us live real-time tracking of portions of the balloon ascent and descent where there was cell coverage.
We also spent some time reading about different Android power management options to ensure that our phones never went to sleep while they were engaged in very important background tasks.
In the next versions of the app, we hope to play with the motion sensors APIs and find a way to time the snapping of our photos to when the payload is aligned and relatively still.

No comments:
Post a Comment